
Today on the JUFSEN BOOK CLUB, we’ll start a new series, based on …
Creative Illustration by Andrew Loomis, released 1947 by its publisher Titan Books, which is a phenomenal book for any artist wanting to make headway for understanding all the nooks and crannies within the craft of not just illustration, but in general, the arts as a whole.
All credit goes to the rightful owner and author of the book, Andrew Loomis and its publisher Titan Books. This is a summation and interpretation in own words.
Part One of the book which discusses the concept of Line, has been divided into FOUR SECTIONS just to make it a little simpler for you!
Section 1 ✿ Seven Primary Functions of Line – p.25
Section 2 ✿ Line and Symbols – p.25 to p.33
꧁ Section 3 ✿ Line as Division – p.34 to p.39 ꧂
Section 4 ✿ Perspective and Catching Attention – p.40 to p.53
Section 5 ✿ Rendering Line – p.54 to p.79
Let’s continue looking at all tools we got for line, picking it up right where we left off!
Now as said in the last Section, S2, any image you see in nature or on the internet and any picture you’ll make imaginatively or from life, whether you know it or not, follows a kind of hidden rhythm that makes up the picture. Every artist will see this rhythm differently, but it’s important that you at least look for it, and try to see it in the composition.
By all means, have fun in interpreting this rhythm you find!
Knowing the concept of rhythm that’s laid out in this book, makes it a good helping hand for expressing more of the what you actually want in your picture, and also makes it a little less complicated to construct the picture in the way you’d like.
So, let’s continue taking a look at more of the tools we can use in creating composition.

As you can read in the picture above, Loomis gives us a neat rule or tool which states that… “The heavier the mass or weight, the nearer it should be placed to the middle line of your picture”.
Why should this be so?
Loomis gives his defence by saying that the subject, material and even the figure within your picture, as we saw in Fun With A Pencil, Part Two, S1, should always be within the picture limits, for it adds a pleasing kind of balance. There are certainly no rules in composition, which Loomis admits too, but there are certain things we can have a gut-feel about and others might too, that something might be better off, if we moved this or that part.
The only rule, for composition, when it concerns a real-life subject is that there are no things that can be exactly duplicated in size (expect when all things are equally arranged and balanced), which is exactly what perspective tells you!
The Fulcrum-Lever-Rule, is in a way, a rule about perspective. Decide where your middle point might land, and what subject or form is in interest, then make use of the rules of perspective and BOOM, there you have it! This set the seal on getting variety in your picture, if that’s what you want of course. (More on perspective in next Section, S4)
Variety is as Loomis says the spice of composition. The more spice you put in the more variety you get in your composition. So, if you got two subjects, which might be equal in size, but one in more key interest, overlap them, one on another. This is what James Gurney calls “Clustering” (Read more on Gurney Journey)
A helpful quote or axiom to remember or take with you, which you of course can experiment around with is…
“The heavier the mass, the nearer the middle- the smaller the mass, the nearer the edge.”
Andrew Loomis

If you want symmetry, respect or even a kind of dignity in the picture you’re making, it is best to make use of what Loomis calls, Formal Subdivision, which is just a fancy phrase for splitting up the picture with line, as to make it symmetrical. In this way, you can arrange your subject to be more in balance and equilibrium, duplicating one side to fit the other.
This type of composition is as Loomis says best used for symbolical figures, heroic subjects, charity, or even peace and serenity. It was used a lot by even the Old Masters such as Raphael, Michelangelo and even Rubens for it lent a helping hand in making the work appear more significant and all the more holy.


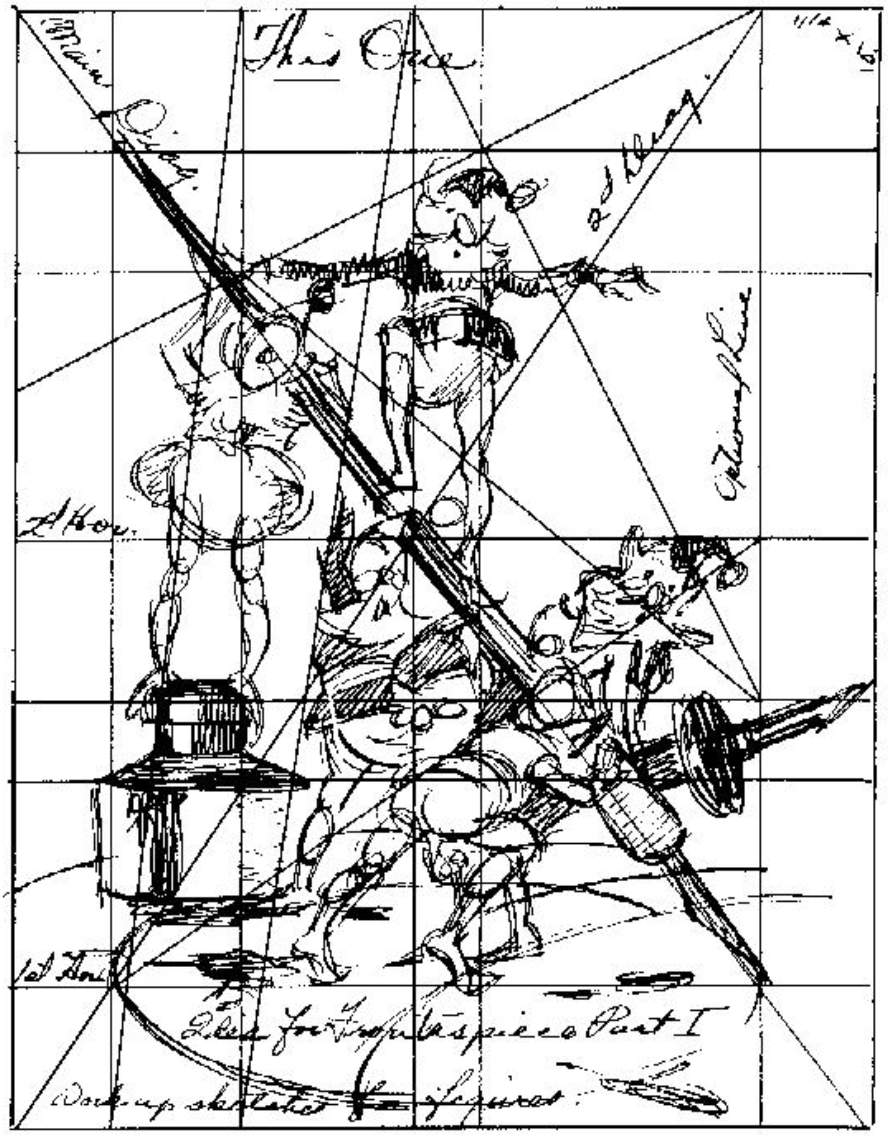
This is what Loomis calls “Informal Subdivision”, which is again, just a fancy phrase for dividing up the image into divisions, now with unequally but with interest.
This is a method that Looms hopes to find to great benefit for others, because it offers more freedom and experimentation for the artist who’s willing to try it out.
Here’s how you go about it! (Scroll through the images above!)
- Draw the shape of a square, rectangle of any size, then divide the whole space by putting a VERTICAL line, placed anywhere you’d like. Avoid being too symmetrical by placing it one-half, one-third and so on. Then, draw a DIAGONAL line, starting and ending at each opposite corner. From the intersection you’ve made from your vertical and diagonal make a HORISONTAL line.
- Now you’ll have a bunch of rectangles and squares that’ll need dividing. Draw only one diagonal line for each space, that is, avoid making a perfect X for the spaces, for that would divide the space equally.
- The diagonals you drew have now made a bunch of intersections. At each intersection, draw either a vertical or horisontal line, you choose. This makes for even more spaces or rectangles which you then could, if you wish, repeat the process of step 2. In this way, you’ll never get a shape of the same size.
- Now, arrange in the figure or figures, decide the space and draw in the contours. Informal Subdivision offers up a great deal of suggestion and ideas for you to play around with, and remember that it is sure helpful to, in before hand, have subject in mind that you can develop on, but even if that isn’t the case, it still offers a big boost for making an imaginative, composition.


This method of Informal Subdivision even plays a part in figure drawings, real-life subjects and so on. It’s an aid in making thumbnails and sketches for your composition. It’s all a matter of selection and invention. Loomis says to have the courage to experiment around, which you’ll surely have, for it removes the blank paper and offers so much possibility. If you’ve got a subject in mind, it’ll develop, and if not, it’ll suggest a subject for you.
Remember to draw the construction lines lightly, and it goes without saying, have fun!


That was all for Section 3 and as said in the last Section, S2, there’s more to come, so be ready! If there’s anything that you think is worth adding and worth saying, please share it in the comments below! Your thoughts and words are valued deeply here on JUFSEN!
As always, thank you for reading!

Leave a comment