

Today on the JUFSEN BOOK CLUB, we’ll discuss Part Three Section 1, Perspective, of the old but gold …
Fun With A Pencil : How Everybody Can Easily Learn to Draw, released 1939 by the American illustrator Andrew Loomis.
This is a summation in own words. All credit goes to author and creator of the book, Andrew Loomis.
To give you some direction and a helping hand, Part Three has been divided into two sections.
꧁ Section 1 ✿ Perspective ꧂
Section 2 ✿ Shading
First of all, if you’ve taken a look through both Part One and Two, with their respective Sections, then give yourself a pat on the back! You now understand all the sorts of principles and tools you need to make your very own imaginative head, that is your very own “Blook” head, as Professor Blook likes to call them. And not only that, you also figured out the difficult but fun task of putting the head on the body, making a full-out figure, your Doohinkus.
So, now that you got all these fun-looking characters that are your own, what to do with all them? Professor Blook says… Why not make a world for them to live in?!
Let’s see how we can go about it.

Now, perspective, is the art of making a 3d illusion on a 2d surface, as you did with your spheres, turning them into heads, and it’s a phenomenally good tool when it comes to accurate world-building. Getting a solid and structural-looking drawing is no picnic, but with a few bunch of things that you’ll get a grasp of, there’s big hope you’ll make it!
(Something deeply recommended for you is to check out Marshall Vandruffs Perspective Drawing Series, it’s a treasure for understanding perspective)
When building your world, you usually start your drawing with a straight, horizontal line. This is your so called “eye-level”, which is a term that explains where you are.
Here’s a fun little experiment to explain it!
- If you can go to the beach at sunset, or just find a place where the horizon and sun is apparent and clear for you to see.
- Sit down and look straight at the line where your horizon is and take notice where the sun is going down.
- Just when you see that the sun has disappeared from your point of view, and the last glimmer of light has gone away, QUICKLY stand up. If didn’t get enough of the first one, now you’ll catch sight of another sunset, letting you experience that beautiful, wonderful glow once again.
Getting a hang of it?
Where you are, that is sitting down, standing up, on a mountain and so on, will affect how much of the horizon you see. This is important to remember.
Draw that eye-level line as explained before, and then put two dots and the end. These are your VP’s, your Vanishing Points, which are helpful references for building a foundation of perspective. Now draw a straight vertical line, wherever you want on paper, it can even cross the eye-level line, you choose! This line can be a person, the corner of a building, even a big monster, and so on, so consider the height of the line carefully.
Here the VP’s come in again. Draw a straight line, starting from your VP, then follow it till you reach the TOP of the vertical line you just made, repeat that with the BOTTOM of the same vertical line. Do the same with the other side of the vertical line. Connect some vertical lines wherever you want that follow the previous perspective lines you made earlier, and there you have it! In this example you made a box in perspective, but that’s just one out of the many of things you can do with good-old perspective.
(Here’s some trivia for you! The concept of perspective was invented somewhere around 1415, by a guy named Filippo Brunelleschi, an Italian architect.)
This is what’s called Two Point Perspective, meaning it uses two VP’s. There’s also One Point Perspective, Three Point and even Four Point and Five Point, which you guessed it, refers to the amount of VP’s it has.

Here are some tips and tricks for you, for getting an accurately placed figure in space!
1 ✦ ➻ On ground that is plain, like a farm field, standing figures must all cut within the same point, in this case it’s near the pelvis.
2 ✦ ➻ Always create your closest figure first, so they fall out of the picture.
3 ✦ ➻ Here’s an example why all figures need to cross between the same line.
4 ✦ ➻ Your figures must be in relation the horizon, so consider the height of the vertical line you make for your figures!
5 ✦ ➻ Once again, compare the sizes of your figures. Determine their heights!
6 ✦ ➻ This is a trick for you! Draw a line corrosponding to your VP, then place any dot, and draw a straight vertical line, the height of the line determines the height of the character.
7 ✦ ➻ Now draw a parallel line to the same VP, this will make a same-height character.
8 ✦ ➻ Repeat the process


The key to building your world and a useful thing to keep in mind when building with perspective is to always keep your objects or figures in correlations with your eye-level and vanishing points. And that your, MP’s, Measuring Points, which is a tool for checking accuracy must always be placed either on the eye-level or perpendicular to the eye level.

If you’ve got a perspective drawing done and dusted, with objects, furniture or figures for this example, that correlate accurately with your VP and MP’s then you can if you’d like, project it onto a ground plane or grid.
For this example, start with making a square, measuring out the sides to correlate to the length of the corresponding BASE LINE. Then make a grid, with an X that divides it. Use the squares in your perspective drawing as a guide! Now place the figures, objects, or furniture in their correct places. There you have it! You’ve projected your perspective drawing onto a ground plane.

You’re probably wondering… if you can project a perspective drawing onto a ground plane, is it then possible to do it the other way? If that’s what’s on your mind, then oh boy, you’re in a for treat, for it sure is so!
Ground plane to perspective is not only more practical and useful for you, but a piece of cake when it comes to planning out your furniture.
Stage ONE
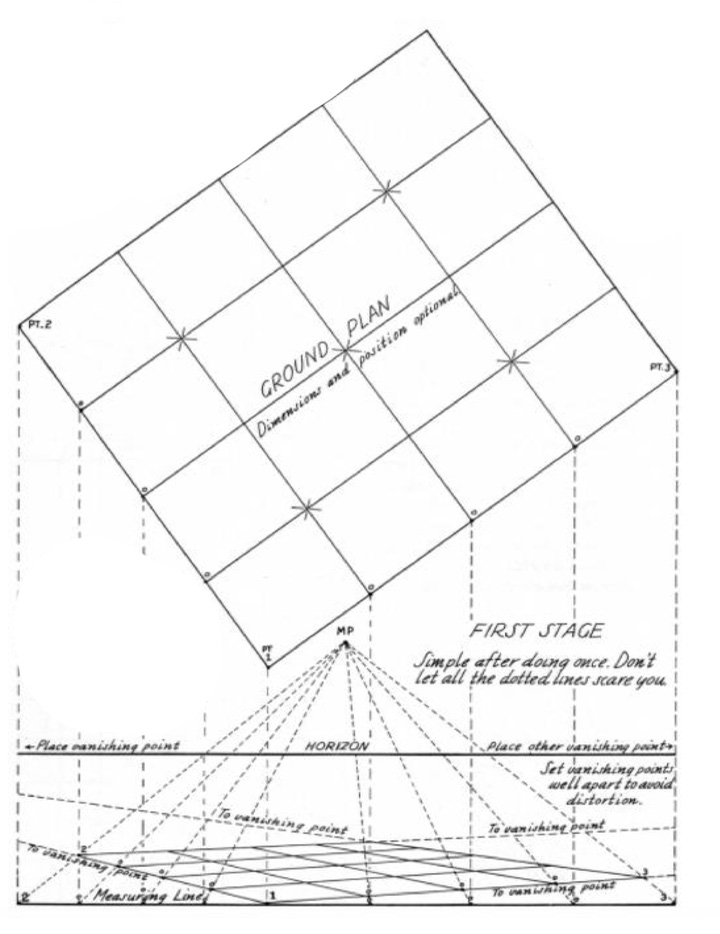
Step 1 : ̗̀➛ Draw a rectangle, a square or whatever the form, that represent the ground plan of your perspective drawing. Divide into 16 parts or more, and draw lines dropping down to the perspective drawing below, most importantly the corner or corners closest to you.
Step 2 : ̗̀➛ Establish your horizon and VP’s, and connect the point closest to you to the corresponding VP’s you just made.
Stage TWO

Here you can have your fun! Look for inspiration anywhere, for example, take a stroll around the house and see what kind of furniture or things you want to put in into the ground plan. Do keep in mind to make the furtnite as it’s seen from the top and in proper scale!
Then mark off the corners of your furniture, or go by freehand to see where the objects or figures might land on your perspective drawing.
Stage THREE
Now with your perspective drawing in place, that’s got to have a thousand different measuring lines and that’s maybe a little too messy, can now be redrawn, cleaned up, and enlarged, by using the grid method, from Part Two, S2 to accurately place all the pieces together, filling in the parts you want to show, in dark and thick lines.
This is what Fun With A Pencil is all about! Using light and easy construction lines and forms to build up your drawing, then laying in the parts in key interest, with darker and thicker lines.

That was all!
An important note to take, is that there’s always more to learn, especially when it comes to perspective, and if you are interested, there are other sources going in much further depth than Loomis does here.
Here’s a few for you to check out!
❁ Marshall Vandruff’s Perspective Drawing Series
❁ Framed Perspective by Marcos Mateu-Mestre
❁ Framed Perspective 2 by Marcos Mateu-Mestre
❁ Perspective Made Easy by Ernest R. Norling
❁ Creative Perspective for Artists and Illustrators by Ernest W. Watson
If there’s anything you think is worth adding please say so! Your words and thoughts mean a lot!
As always thank you for reading!

Leave a comment